
🐣 Looking for an adorable and easy crochet project? You’re in the right place! In this step-by-step tutorial, I’ll show you exactly how to crochet a cute amigurumi chicken — perfect for Easter baskets, springtime gifts, or simply to brighten someone’s day. 💛
This project is beginner-friendly and works up quickly using basic stitches like single crochet and simple increases. Whether you’re brand new to amigurumi or just love fast and fun plushie patterns, this little chicken will definitely make you smile. Ready to crochet something egg-stra cute? Let’s get started! 🧶✨
🎥 Watch the full video tutorial here:
How to Crochet a Cute Amigurumi Chicken – Easy Step-by-Step Tutorial 🐣
🎀 Why You’ll Love This Project
- ✔️ Beginner-Friendly – Simple shapes and stitches make this a fun first amigurumi project!
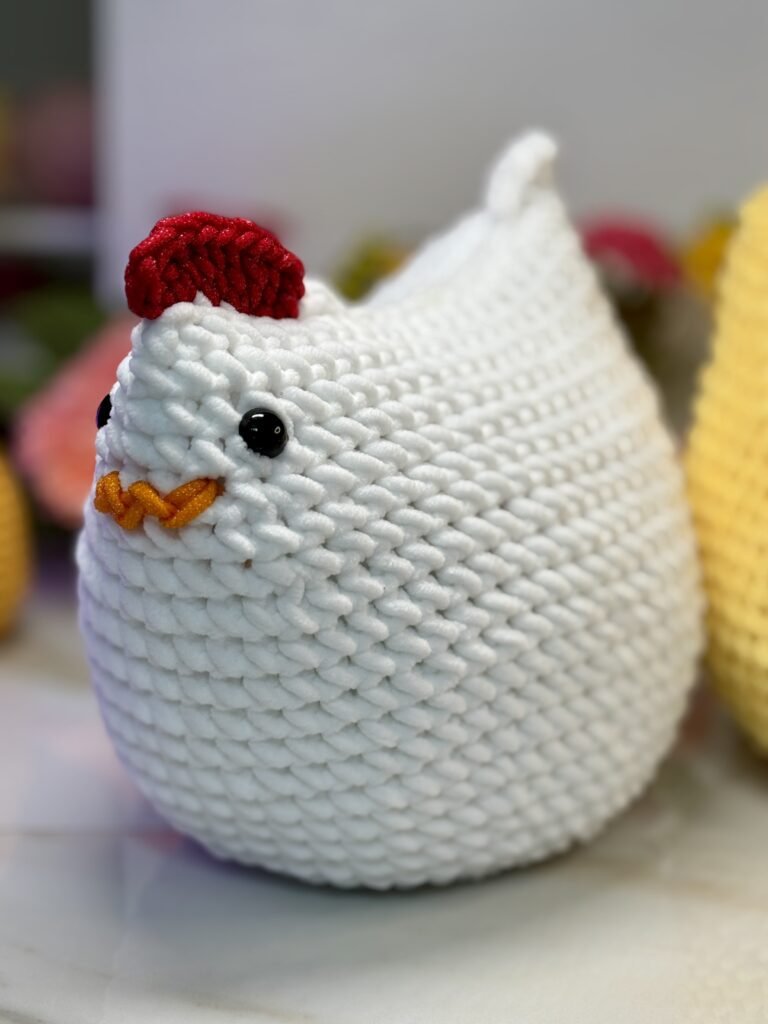
- 🐤 Super Cute Design – A round fluffy body, and a cut sweet simple beak make this chicken irresistibly adorable.
- 🎨 Customizable Colors – Use classic yellow and orange or try pastel pinks, blues, or even rainbow tones.
- 🧶 Great for Scrap Yarn – This pattern uses small amounts of yarn, so it’s perfect for using up leftovers.
- 🎁 Perfect for Gifting – A thoughtful handmade surprise for Easter baskets, baby showers, or spring decor.
✨ Inspiration Behind the Design
This adorable amigurumi chicken was inspired by a sweet message from one of my viewers who asked for a beginner-friendly Chicken pattern that’s easy to follow and fun to crochet. 🐥
I wanted to create something cheerful, simple, and perfect for new crocheters — using just basic stitches and a few colors of yarn. The round, fluffy shape and tiny details make this little chicken extra lovable, whether you’re gifting it or keeping it for your own handmade collection!
💡 Tip: Try switching up the colors to make a whole flock of chickens — each with their own personality!
🧵 Materials You’ll Need
This adorable chicken works up quickly with just a few supplies. I’ve included affiliate links for easy shopping!
- 🧶 Yarn – Bulky Weight (#5): I used POSH by Big Twist (100% polyester), but a great substitute is Soft Velvet Baby Yarn in White.
- 🧶 Small Amounts of Red & Orange Yarn – For the beak and crest details.
- 🪝 Hook Size: 7 mm Crochet Hook (Blue)
- 👁️ Safety Eyes: 6–8 mm – Click here to view
- 🧷 Stitch Markers: Clover Locking Stitch Markers
- 🪡 Tapestry Needle: Clover Tapestry Needles
- 🧵 Yarn Holder: Yarn Spinner / Dispenser
- 🧸 Stuffing: Poly-Fil Fiber Stuffing
- ✂️ Scissors
Note: If you use thinner yarn, your chicken will turn out smaller. Also, the amount of stuffing you add will affect the shape—more stuffing = rounder and firmer; less stuffing = softer and more relaxed.
🛍️ Some of the links above are affiliate links. This means I may earn a small commission (at no extra cost to you) if you purchase through them. Thank you for supporting Yarn Creation Ideas so I can keep sharing free patterns and tutorials! 💛
🧵 Stitch Abbreviations (US & UK)
| Abbreviation | US Term | UK Equivalent | Description |
|---|---|---|---|
| ch | Chain | Chain | Foundation or turning stitch |
| sl st | Slip Stitch | Slip Stitch | Join or move without height |
| sc | Single Crochet | Double Crochet | Short, tight stitch |
| dc | Double Crochet | Treble Crochet | Taller stitch with one yarn over |
| tr | Treble Crochet | Double Treble Crochet | Very tall stitch with two yarn overs |
| hdc | Half Double Crochet | Half Treble Crochet | Mid-height stitch with one yarn over |
| inc | Increase | Increase | Two stitches in one stitch |
| dec | Decrease | Decrease | Two stitches worked together |
| FO | Fasten Off | Fasten Off | Cut and secure yarn |
| st(s) | Stitch(es) | Stitch(es) | General stitch reference |
| BLO | Back Loop Only | Back Loop Only | Work into back loop for texture |
| STACKED SC | Stacked Single Crochet | Stacked Double Crochet (UK) | Used in place of a turning chain |
✂️ Tip: You can screenshot or print this Stitch Abbreviations Chart to keep next to your workspace. It’s especially handy if you’re switching between US and UK terms or learning new stitch names!
🧠 Skill Level
✔️ Skill Level: Beginner-Friendly
2 out of 5 difficulty – perfect for first-time amigurumi makers!
- ✔️ Basic stitches used: magic ring, single crochet, increase, decrease, slip stitch
- ✔️ Minimal shaping involved – all parts are made with simple rounds
- ✔️ Beginner-friendly assembly – just a few small parts to sew together
💡 Tip: This is a great starter project if you’re new to amigurumi and want something quick, fun, and super cute to build confidence!
Welcome to my crochet corner! 🧶 In today’s tutorial, I’m excited to share a super cute amigurumi chicken pattern, inspired by a request from one of my wonderful followers. 🐥✨ This crochet chicken is soft, plush, and perfect for gifts, decorations, or even as a cute toy.
🐣 Step-by-Step Crochet Pattern for the Chicken Body
Head & Body:
We will work in continuous rounds, so use a stitch marker to keep track.
Round 1:
8 SC in Magic Ring (8)
Round 2:
INC in each stitch around (16)
Round 3:
(1 INC, 1 SC) x 8 (24)
Round 4:
(3 SC, 1 INC) x 6 (30)
Round 5:
(2 SC, 1 INC, 2 SC) x 6 (36)
Round 6:
(1 INC, 5 SC) x 6 (42)
Round 7:
(3 SC, 1 INC, 3 SC) x 6 (48)
Round 8:
(15 SC, 1 INC) x 3 (51)
Round 9:
SC in each stitch around (51)
Round 10:
(16 SC, 1 INC) x 3 (54)
Round 11:
(8 SC, 1 INC) x 6 (60)
Rounds 12-18:
SC in each stitch around (60 for 7 rounds)
At this point, you should see the round and plump body of the chicken forming. 🐤
✨ Shaping the Chicken (Decreases Start Here!)
Round 19:
6 SC, 1 DEC, 16 SC, 1 DEC, 10 SC, 1 DEC, 16 SC, 1 DEC, 4 SC (56)
Round 20:
SC in each stitch around (56)
Round 21:
5 SC, 1 DEC, 16 SC, 1 DEC, 8 SC, 1 DEC, 16 SC, 1 DEC, 3 SC (52)
Round 22:
SC in each stitch around (52)
Round 23:
4 SC, 1 DEC, 15 SC, 1 DEC, 8 SC, 1 DEC, 14 SC, 1 DEC, 3 SC (48)
Rounds 24-25:
SC in each stitch around (48)
🏡 Assembly: Adding Features to the Chicken
Now that the body is shaped, it’s time to add some personality!
👀 Positioning the Safety Eyes
- Place the safety eyes on Round 4, leaving 6 stitches between them.
- Secure them before you close the top of the head.
🐤 Creating the Beak (Orange Yarn)
- Use orange yarn and create 6 slip stitches in a zig-zag style (not in a straight line).
- Leave a tail to secure the ends inside.
🧸 Stuffing the Chicken
- Add stuffing inside the chicken before closing the top.
- Shape it as desired—more stuffing makes it round and firm, while less makes it soft and relaxed.
🔴 Closing the Top and Adding the Tail & Crest
Closing the Top of the Chicken
- CH 1, SC through the inside loops of both sides, CH 1 (Repeat 4 times).
- You’ll create a small tail-like closure on the back.
🟥 Adding the Crest (Red Yarn)
- Attach red yarn at the top of the head.
- CH 1, SC, CH 1, SC
- Switch to 2 DC, (2 DC in the same stitch) x 2, 3 DC in the same stitch.
- Cut the yarn and weave in the ends securely.
💡 Final Tips & Variations
- Want a mini chicken? Use a lighter weight yarn and a smaller hook.
- Want a fuzzy chicken? Try mohair or textured yarn for a unique look!
- Make it a keychain! Simply attach a keyring loop to the top.
- Personalize it! Add embroidered details or small wings for extra cuteness.
📌 Pattern Terms of Use & License
- ✅ You are welcome to sell finished products made from this pattern — handmade with love is always appreciated!
- ❌ You may not sell, reproduce, or redistribute the pattern itself in any form, whether digital or printed.
- 🌐 For kits, workshops, or mass production, please contact me directly to request permission.
📸 If you share your finished Amigurumi Chicken, I’d love to see it!
Please credit: 👉 YarnCreationIdeas.com
Tag me on social media so I can cheer you on! ❤️
🔗 Want to share this pattern with others?
You’re welcome to share the blog post link directly so others can enjoy the free tutorial too! Please don’t copy and paste the pattern elsewhere.
🎥 Watch the Full Tutorial
If you’d like to follow along visually, check out my full YouTube tutorial where I walk you through each step in real-time:
📹 Watch the Amigurumi Chicken Tutorial on YouTube
💬 Comments & Questions
Have a question about the pattern? Need help with a stitch?
I’m here to help!
🌍 Feel free to leave a comment below — I love hearing from you. Whether it’s a question, a finished project you want to show off, or just saying hello, your messages mean a lot! 💕
📸 If you made the Amigurumi Chicken, be sure to tag me on social media or share it using the hashtag #YarnCreationIdeas so I can celebrate your creativity!
Let’s stitch and grow together! 🌟
❤️ Share Your Work!
I’d love to see your finished crochet chickens! 🐣✨
- 📸 Tag me on TikTok or Pinterest @YarnCreationIdeas
- 🌐 Join my crochet community for more fun tutorials and creative ideas!
If you enjoyed this pattern, please share, comment, and subscribe to my YouTube channel for more adorable amigurumi projects. 🎬🧵
Happy crocheting! 🧡🐥
—