🐮 Easy Highland Cow Crochet Key Chain (AI vs. Me) – FREE Pattern + Video Tutorial

Side-by-side comparison of an AI-generated crochet Highland Cow and a handmade version with orange looped hair, featuring bold yellow text: "Tutorial & Free Pattern – Crochet Highland Cow Keychain (AI vs. Me)."

Ready to crochet your own adorable Highland Cow keychain? This cute and fuzzy design makes the perfect gift, backpack charm, or mini decor piece for animal lovers! Scroll down for the full FREE pattern and step-by-step assembly guide. 🧶✨

💖 Why You’ll Love This Project

Beginner-Friendly – Simple shapes, basic stitches, and easy-to-follow steps make this a great introduction to amigurumi!
🧶 Great for Scrap Yarn – Perfect way to use up your leftover browns, oranges, or textured yarns.
🐮 Adorably Unique – Each Highland Cow has its own fuzzy hair and floppy charm.
🎨 Fun to Customize – Change the horn or hair color, add bows or blush — make it your own!
🧷 Keychain Ready – Practical, giftable, and travel-sized cuteness.
🎁 Perfect for Gifting – A fun surprise for animal lovers, kids, or market stalls.
🎥 Video Tutorial Included – Stitch along with the full visual guide, great for visual learners.

✨ This is the perfect project if you’re looking for Highland Cow crochet, free crochet keychain patterns, or a fun beginner-friendly amigurumi to add to your collection.

🌟 Inspiration Behind the Design

This Highland Cow was inspired by the popular fuzzy farm animal trend and AI-generated crochet designs! I wanted to capture the cow’s charm and personality with big fluffy loops, soft colors, and a keychain twist that makes it travel-ready. The design is part of my AI vs. Me series — blending handmade love with modern inspiration.

💡 Inspired by one of my sweet followers from Scotland, I took one of my AI-generated Highland Cow crochet images and brought it to life — with yarn! Meet Hamish, the adorable fuzzy Highland Cow. I followed my own creative process, took notes along the way, and developed this beginner-friendly FREE crochet pattern just for you to enjoy.

This post contains affiliate links. If you click and make a purchase, I may earn a small commission — at no extra cost to you. Thank you for supporting my crochet blog! 💕

🧵 Materials & Yarn Breakdown

✅ Skill Level

Level: Beginner to Intermediate
✅✅✅⚪️⚪️
3 out of 5 difficulty – great for confident beginners

✔️ Basic stitches used: chain, single crochet, increase, decrease, slip stitch
✔️ Some shaping and construction involved (ears, muzzle, horns)
✔️ Simple sewing and hair-loop techniques
✔️ No color changes required — but customizable if desired!

📏 Finished Size

Approximately 3.5 inches wide x 5 inches tall
(~9 cm x 13 cm)

This compact and charming size makes it ideal for:

✔️ Car Mirror Charm – Add a touch of handmade cuteness to your dashboard
✔️ Beach or Travel Bag Accessory – Clip it on for a playful, farm-inspired accent
✔️ Backpack or Purse Buddy – A fun way to personalize your daily essentials
✔️ Gift Topper – Use it as a reusable add-on for wrapping presents
✔️ Ornament – Hang on a seasonal tree or shelf hook for year-round smiles

 Note: The finished size may vary slightly based on your tension, yarn weight, and hook size. 

🧵 Stitch Abbreviations (US & UK)

Abbreviation US Term UK Equivalent Description
ch Chain Chain Foundation or turning stitch
sl st Slip Stitch Slip Stitch Join or move without height
sc Single Crochet Double Crochet Short, tight stitch
dc Double Crochet Treble Crochet Taller stitch with one yarn over
tr Treble Crochet Double Treble Crochet Very tall stitch with two yarn overs
hdc Half Double Crochet Half Treble Crochet Mid-height stitch with one yarn over
inc Increase Increase Two stitches in one stitch
dec Decrease Decrease Two stitches worked together
FO Fasten Off Fasten Off Cut and secure yarn
st(s) Stitch(es) Stitch(es) General stitch reference
BLO Back Loop Only Back Loop Only Work into back loop for texture
STACKED SC Stacked Single Crochet Stacked Double Crochet (UK) Used in place of a turning chain

✂️ Tip: You can screenshot or print this Stitch Abbreviations Chart to keep next to your workspace. It’s especially handy if you’re switching between US and UK terms or learning new stitch names!

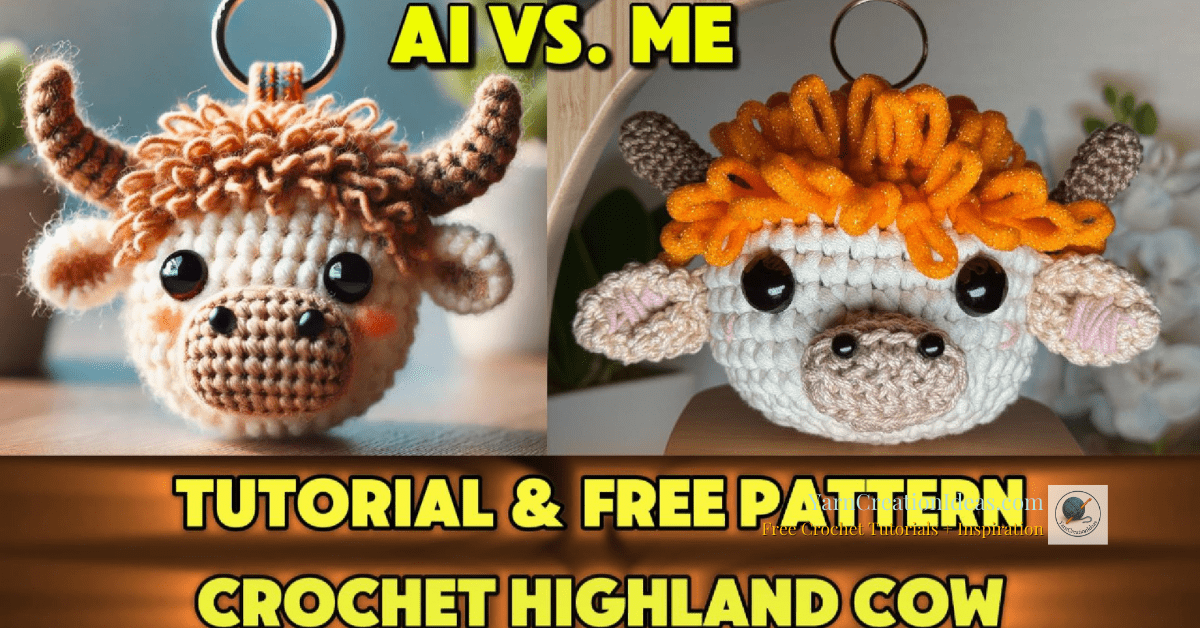
🐮 Head (with #4 yarn, 3.5 mm hook)

Round 1: MR, 8 sc  (8 stitches)
Round 2: inc in each st  (16 stitches)
Round 3: (1 inc, 1 sc) x 8 = 24 stitches
Round 4: (3 sc, inc) x 6 = 30 stitches
Round 5: (2 sc, inc, 2 sc) x 6 = 36 stitches
Round 6: (1 inc, 5 sc) x 6 = 42 stitches
Rounds 7–8: 42 sc

➕ Pause to add hair loops (see Hair section below for details)

Rounds 9–11: 42 sc
👁️ Insert safety eyes between Rounds 8 and 9, about 6 stitches apart

Round 12: (5 sc, dec) x 6 = 36 stitches
Round 13: 1 sc, (4 sc, dec) x 5, 3 sc = 30 stitches
Round 14: (3 sc, dec) x 6 = 24 stitches

✨ Embroider pink cheeks before closing

Round 15: (1 sc, dec) = 16 stitches
Round 16: 8 dec

✂️ Finish off, sew closed, and weave in the end.

🧡 Hair Loops (Fringe)

Yarn: Scrub-style or textured yarn (e.g. orange scrub yarn)
Hook Size: 4.5 mm
Placement: Start at Round 6 of the head and work downward toward Round 2

Follow this step-by-step to create the Highland Cow’s signature fluffy fringe:


✨ Loop Placement Breakdown

  • Round 6 to 5 → ~18 loops

  • Round 5 to 4 → ~14 loops

  • Round 4 to 3 → ~10 loops

  • Round 3 to 2 → ~6 loops


🧶 Instructions

  1. Mark the center front of the cow’s forehead (starting from Round 6).

  2. Bring the yarn up from the back of the head.

  3. Insert hook, yarn over, and pull through to make a loop.

  4. Slip stitch in place and adjust the loop size.

  5. Repeat this method in rows, decreasing the number of loops as you move downward.

  6. Continue layering loops until the desired coverage is achieved.

🎀 Adjust the loop sizes for extra fluff or trim to shape after sewing.

🐽 Muzzle & Nose

Yarn: #4 cotton yarn (e.g. Yarn Bee Fundamental Cotton)
Hook Size: 3.0 mm
Optional: Tiny safety eyes or embroidery for nostrils


✨ Instructions

  1. Make a loose slip knot and insert your hook into the back loop of the knot.

  2. Yarn over — now you have 2 loops on your hook.

  3. Pull the tail to tighten the first loop.

  4. Yarn over again and pull through both loops to make the first single crochet (SC).

  5. Insert your hook into the left leg of that stitch and make another SC on top — this “stacks” the SC.

  6. Continue until you have 6 stacked single crochets for the foundation.


🧵 Shaping the Muzzle

  • Back Loop Only (BLO):

    • Work 5 sc (1 in each stitch of the foundation)

    • Make 3 sc in the next stitch = 8 stitches

    • Work 5 sc along the bottom

    • Make 3 sc in the next stitch = 16 total stitches

  • Next Round: BLO 16 sc (close the round)

  • Final Round: ch 1, 16 sc
    ✂️ Fasten off, leaving a long tail for sewing.

🐮 Ears (Make 2)

Yarn: #4 worsted weight
Hook Size: 3.0 mm

Round 1: MR, 6 sc
Round 2: (inc, sc) x 3 = 9 stitches
Round 3: (inc, 2 sc) x 3 = 12 stitches
Round 4: (inc, 3 sc) x 3 = 15 stitches
Rounds 5–6: 15 sc

✂️ Finish off, leaving a long tail for sewing.
🎀 Add a few pink stitches to mimic the inner ear.
🪡 Flatten and fold the ear before attaching it to the head.

🐮 Horns (Make 2)

Yarn: #3 light weight yarn (beige or gray)
Hook Size: 2.0 mm

Round 1: MR, 6 sc
Round 2: (inc, sc) x 3 = 9 stitches
Rounds 3–5: 9 sc
Round 6: 4 sc, inc, 4 sc = 10 stitches
Rounds 7–9: 4 sl st, 6 sc = 10 stitches
Rounds 10–11: 10 sc

✂️ Fasten off, leaving a long tail for sewing.
🪡 Attach horns just behind the hair on top of the head.


🪡 Step-by-Step Assembly Guide

✔️ Sew the horns to the top of the head, just behind the hair loops.
✔️ Attach the ears slightly below the horns — fold and flatten before sewing for a natural curve.
✔️ Add the hair loops if you haven’t already (see 🧡 Hair section above). Start at Round 6 and work down to Round 2.
✔️ Position the muzzle centered below the eyes and sew securely in place.
✔️ Embroider cheeks or blush if desired, using pink yarn or embroidery floss.
✔️ Insert safety eyes before fully closing the head between Rounds 8 and 9 — position them evenly 4–5 stitches apart.

🧵 Finishing Touches

🎀 Trim or fluff the loops as needed to shape the cow’s hair
🔗 Attach the keychain ring to the top of the head using the yarn tail or a jump ring
📸 Take a picture of your finished cow and give them a name — mine is Hamish!

🎥 Watch the Step-by-Step Video Tutorial

Want to see this Highland Cow come to life? 🧶✨
Follow along with the full visual walkthrough on my YouTube channel! This tutorial is perfect for beginners and walks you through every detail step by step.

📺 Watch Now:
▶️ Easy Highland Cow Crochet Key Chain Tutorial (AI vs. Me) – YouTube

💬 Don’t forget to Like, Comment, and Subscribe if this video helps you!
I’d love to hear if your Highland Cow turned out just as fuzzy and cute! 💕🐮

📢 Pattern Terms of Use & License

✅ You are welcome to sell finished products made from this pattern — handmade with love is always appreciated!

🚫 You may not sell, reproduce, or redistribute the pattern itself in any form, whether digital or printed.

🧶 For kits, workshops, or mass production, please contact me directly to request permission.

📸 If you share your finished Highland Cow Key Chain, I’d love to see it!
Please credit: 👉 YarnCreationIdeas.com
Tag me on social media so I can cheer you on! 💕
🔗 Want to share this pattern with others?
Feel free to share the blog post link directly so others can enjoy the free tutorial too!

💬 Comments & Questions

Have a question about the pattern? Need help with a stitch or assembly step?
I’m here to help!

🧶 Feel free to leave a comment below — I love hearing from you! Whether it’s a question, a finished Highland Cow you want to show off, or just stopping by to say hello, your messages truly make my day. 💕

📸 If you made your own Highland Cow Key Chain, don’t forget to tag me on social media or use the hashtag #YarnCreationIdeas so I can see and celebrate your creation!

Let’s keep stitching and growing together! 🌟

📌 Love This Pattern? Save It for Later!

If you enjoyed this project, pin it to your favorite board so you can come back anytime!
It really helps support this blog and share the yarn love 💕

📍Hover over the image below to save it on Pinterest:
(Or click the Pinterest icon at the top of this post!)

🧵 Tag your project: #YarnCreationIdeas
📸 Mention me @YarnCreationIdeas — I’d love to see your Hamish!

Leave a Comment

Your email address will not be published. Required fields are marked *

Scroll to Top