Looking for an adorable and expressive crochet dog pattern to add charm to your next project? Meet Poppy — the floppy-eared pup that’s bursting with personality! 💕
This easy and beginner-friendly pattern is perfect for creating a cute dog appliqué on a granny square, which you can then use for baby blankets, tote bags, pillows, and wall hangings. With bright colors, detailed layers, and simple stitches, it’s a joyful project for any yarn lover.
🎥 Watch the full tutorial here: How to Crochet a Cute Dog Appliqué on a Granny Square
🐾 Why You’ll Love This Project
✅ Beginner-Friendly – Uses simple shapes and stitches. It’s fun and satisfying to assemble!
🎨 Endlessly Customizable – Mix and match colors, ears, eyes, bows — every pup can be unique!
🧶 Great for Scrap Yarn – Use up your bold and bright yarn leftovers.
🎁 Perfect for Gifting – Patch together multiple squares for baby gifts or pet lovers.
🧵 Technique-Rich – Combines layering, shaping, and colorwork in one playful pattern.
🛋️ Adds Personality – A sweet touch for blankets, pillows, tote bags, or nursery decor.
🐶 So Much Expression – Every Poppy face comes out with its own mood and charm!
✨ This is the perfect project if you’re looking for dog crochet, crochet toys free patterns, or a unique crochet puppies free pattern to add to your collection.
✨ Inspiration Behind the Design
I wanted to design something joyful, expressive, and fun to personalize my crochet projects. What better than a floppy-eared pup named Poppy?
Each version you create can have its own emotion, style, and flair. In the photo above, I played with soft pastels and playful brights — perfect for springtime or gift sets.
💡 Tip: Try switching the background colors to make themed collections: rainbow pups, holiday pups, or even a mix of breeds by changing ear shapes!
This post contains affiliate links. If you click and make a purchase, I may earn a small commission — at no extra cost to you. Thank you for supporting my crochet blog! 💕
Materials & Tools
Yarn Type: Yarn #1, #2, and #3
Hook Sizes: 2.75 mm & 3.5 mm (Use 3.5 mm with #3 yarn)
Colors Used: Peach, Aqua, Pink, Orange, Blue, Yellow, White, Black or Blue
Other Tools: Scissors, tapestry needle, stitch markers
🧶 Yarn Weight Breakdown for This Project
For the Poppy Dog Appliqué on a Granny Square, you can use a mix of lightweight yarns to create dimension and detail. Below are the yarn weights used:
Yarn Weight #1 – Super Fine
Also Called: Fingering weight, Sock yarn, Baby yarn
Best For: Small features like pupils, nose, and bow details
Fiber Diameter: 14–30 WPI (wraps per inch)
Crochet Hook Size: 2.75 mm
Texture: Thin and flexible — great for delicate layers and appliqué work
🧶 Try This Yarn: Rome Yarn Summer
Lightweight, silky-soft, and ideal for detailed crochet work. This is the exact yarn I used in my Poppy Dog Appliqué! I also paired it with Big Twist Baby Bunny yarn for contrast and softness.
✅ Yarn Weight #2 – Fine
Also Called: Sport weight, Baby yarn
Best For: Muzzle, ears, tongue, and mid-size facial parts
Fiber Diameter: 12–18 WPI
Crochet Hook Size: 2.75 mm
Texture: Slightly thicker but still ideal for shaping and soft detail
🧶 Try This Yarn: YarnArt Jeans
This is one of my favorite soft and durable yarns for fine details — perfect for the Poppy Dog Appliqué’s ears and muzzle! I also paired it with Big Twist Amigurumi for contrast and shaping.
✅ Yarn Weight #3 – Light
Also Called: DK (Double Knitting), Light Worsted
Best For: Granny square base, entire face structure, and large sections like the eyes
Fiber Diameter: 11–14 WPI
Crochet Hook Size: 3.5 mm
Texture: The most balanced yarn weight — firm enough for structure, yet soft and flexible for shaping
🧶 Try This Yarn: Rome Baby Yarn #3 Anti-Pilling DK
This is the yarn I used for the granny square base in this project. It holds shape beautifully and feels soft to the touch — perfect for appliqué backgrounds and projects that need structure with softness.
Yarn Weight | Common Name | Best Use in This Project | Recommended Hook for This Project |
---|---|---|---|
#1 – Super Fine | Fingering, Sock, Baby | Small features (eye balls, pupils, bow) | 2.75 mm |
#2 – Fine | Sport, Baby | Muzzle, floppy ears, outer eyes, nose | 2.75 mm |
#3 – Light | DK, Light Worsted | Granny square base, entire face structure | 3.5 mm |
Skill Level
Level: Beginner to Intermediate
3 out of 5 difficulty – great for confident beginners
Basic stitches used: chain, single crochet, double crochet, treble crochet, stacked single crochet, slip stitch
Some shaping and color changes involved
Simple sewing and layering techniques
Tip: If you’ve completed a few granny squares or basic appliqués, you’re ready for this! The video tutorial walks you through every step, making this an excellent pattern for leveling up your crochet skills while having fun.
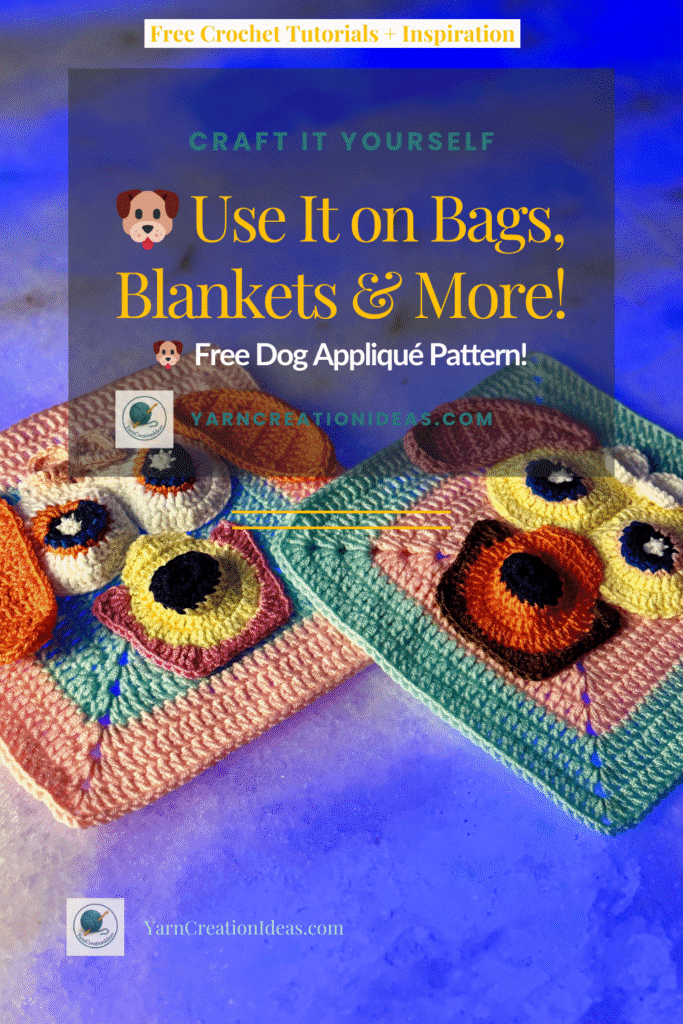
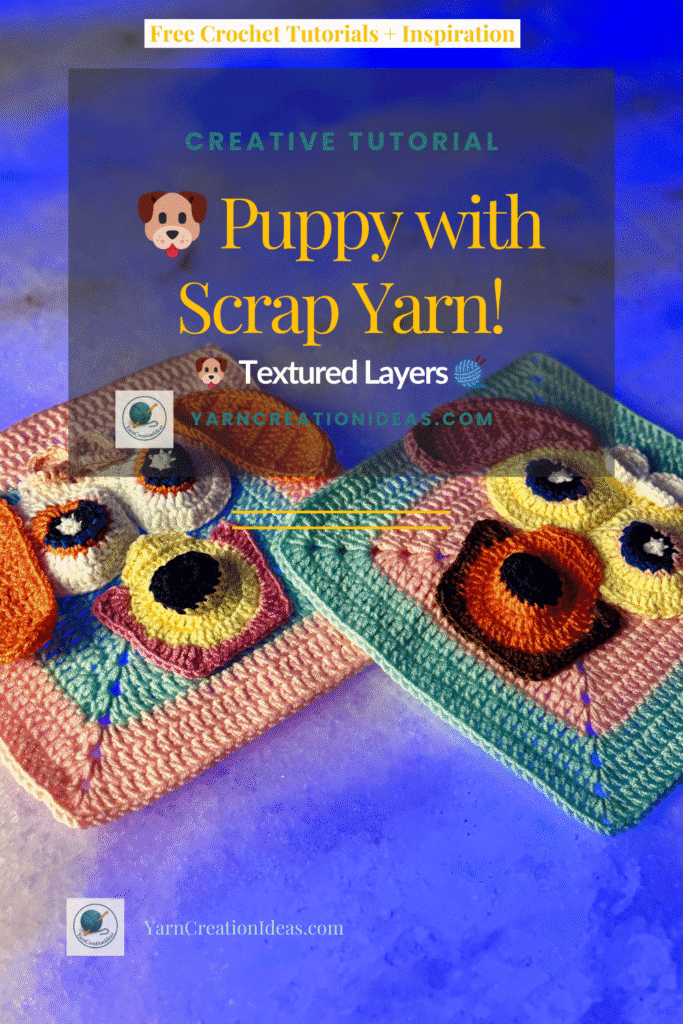
Finished Size
Final Dimensions: The completed granny square, including the Poppy Dog appliqué, measures approximately:
7 x 7 inches (18 x 18 cm)
This size makes it ideal for:
Joining with other squares to create a baby blanket or pillow front
Using as a stand-alone patch for tote bags or wall hangings
Framing for decorative nursery or pet room art
Note: The finished size may vary slightly based on your tension, yarn weight, and hook size. Light blocking can help shape the square and flatten the appliqué.
🧵 Stitch Abbreviations (US & UK)
Abbreviation | US Term | UK Equivalent | Description |
---|---|---|---|
ch | Chain | Chain | Foundation or turning stitch |
sl st | Slip Stitch | Slip Stitch | Join or move without height |
sc | Single Crochet | Double Crochet | Short, tight stitch |
dc | Double Crochet | Treble Crochet | Taller stitch with one yarn over |
tr | Treble Crochet | Double Treble Crochet | Very tall stitch with two yarn overs |
hdc | Half Double Crochet | Half Treble Crochet | Mid-height stitch with one yarn over |
inc | Increase | Increase | Two stitches in one stitch |
dec | Decrease | Decrease | Two stitches worked together |
FO | Fasten Off | Fasten Off | Cut and secure yarn |
st(s) | Stitch(es) | Stitch(es) | General stitch reference |
BLO | Back Loop Only | Back Loop Only | Work into back loop for texture |
STACKED SC | Stacked Single Crochet | Stacked Double Crochet (UK) | Used in place of a turning chain |
✂️ Tip: You can screenshot or print this Stitch Abbreviations Chart to keep next to your workspace. It’s especially handy if you’re switching between US and UK terms or learning new stitch names!
🟫 Granny Square – Face Base Pattern
Hook: 3.5 mm
Yarn: #3 (I used a beautiful light peach for the main square and aqua for the border)
🔁 Round 1
Make a slip knot
Ch 4, join with a sl st to form a circle
Work: 1 Stacked SC, Ch 2, 3 DC, Ch 2, 3 DC, Ch 2, 3 DC, Ch 2, 2 DC
Sl st to close the round
🔁 Round 2
Stacked SC, 1 DC, Ch 2
7 DC (2 DC in the corner, 3 DC — one in each stitch, 2 DC in the corner), Ch 2
Repeat this 2 more times
Final side: 5 DC (2 DC in the corner, 3 DC one in each stitch), sl st to close
🔁 Round 3
Sl st to next available stitch
Stacked SC, 1 DC, Ch 2
11 DC (2 DC in the corner, 7 DC — one per stitch, 2 DC in the corner), Ch 2
Repeat x2
Final side: 9 DC (2 DC in corner, 7 DC), sl st to close
🔁 Round 4
Sl st to next space
Stacked SC, 1 DC, Ch 2
15 DC (2 DC in corner, 11 DC — one per stitch, 2 DC in corner), Ch 2
Repeat x2
Final side: 13 DC (2 DC in corner, 11 DC), sl st to close
🔁 Round 5
Sl st to next space
Stacked SC, 1 DC, Ch 2
19 DC (2 DC in corner, 15 DC — one per stitch, 2 DC in corner), Ch 2
Repeat x2
Final side: 19 DC, sl st to close
🔁 Round 6
Sl st to next space
Stacked SC, 1 DC, Ch 2
23 DC (2 DC in corner, 19 DC — one per stitch, 2 DC in corner), Ch 2
Repeat x2
Final side: 21 DC, sl st to close
✨ Change Color to Aqua
🔁 Round 7
Sl st to next space using aqua yarn
Stacked SC, 1 DC, Ch 2
27 DC (2 DC in corner, 23 DC — one per stitch, 2 DC in corner), Ch 2
Repeat x2
Final side: 25 DC, sl st to close
🔁 Round 8
Sl st to next space
Stacked SC, 1 DC, Ch 2
31 DC (2 DC in corner, 27 DC — one per stitch, 2 DC in corner), Ch 2
Repeat x2
Final side: 29 DC, sl st to close
🔁 Round 9
Sl st to next space
Stacked SC, 1 DC, Ch 2
35 DC (2 DC in corner, 31 DC — one per stitch, 2 DC in corner), Ch 2
Repeat x2
Final side: 33 DC, sl st to close
👁️ Eyes – Make 2
Hook: 2.75 mm
Yarn Colors: White, Dark Blue (or Black), Bright Blue, Peach, Bright Yellow
🌀 Step 1: Eye Center (White + Dark Blue)
Start with white yarn
MR, work 7 SC into the ring
Change to dark blue or black before closing the round
Work: 3 INC, then 2 DC in each of the next 4 stitches
🔢 You should have 14 stitches total in this round
Change color to bright blue before closing
🧵 Step 2: Shape the Eyelid (Bright Blue)
Ch 1, turn
Work in BLO only:
3 SC (one per stitch)
3 HDC (one per stitch)
3 SC (one per stitch)
Sl st to the next stitch
Cut yarn and clean up tails
🍑 Step 3: Add Peach Outline
Join peach yarn in BLO
Ch 1
Work: (1 INC, 1 SC) x 4 → 12 stitches
Then: 2 DC in each of the next 5 stitches → 10 stitches
🔢 Total: 22 stitches
Change to bright yellow before finishing
🌕 Step 4: Yellow Highlight Rounds
With yellow yarn:
STACKED SC, 1 DC in same stitch, 1 DC in next stitch
Then: (2 DC, 1 DC) x 10 → 30 stitches
🔢 Total: 33 stitches
Next round:
STACKED SC, 1 DC in same stitch, 1 DC in next 2 stitches
Then: (2 DC, 1 DC in next 2 stitches) x 10
🔢 Total: 44 stitches
🔗 Join the Two Eyes Together
Step 5: Seam the Eyes with Bridging Stitches
Start with the right eye
Ch 1
Work: 1 SC, 2 HDC, 2 DC, 2 TC
Bring in the left eye
Work: 2 TC, 2 DC, 2 HDC, 1 SC
Turn your work
In BLO: Work 1 SC across the next 13 stitches
Finish with a Sl st
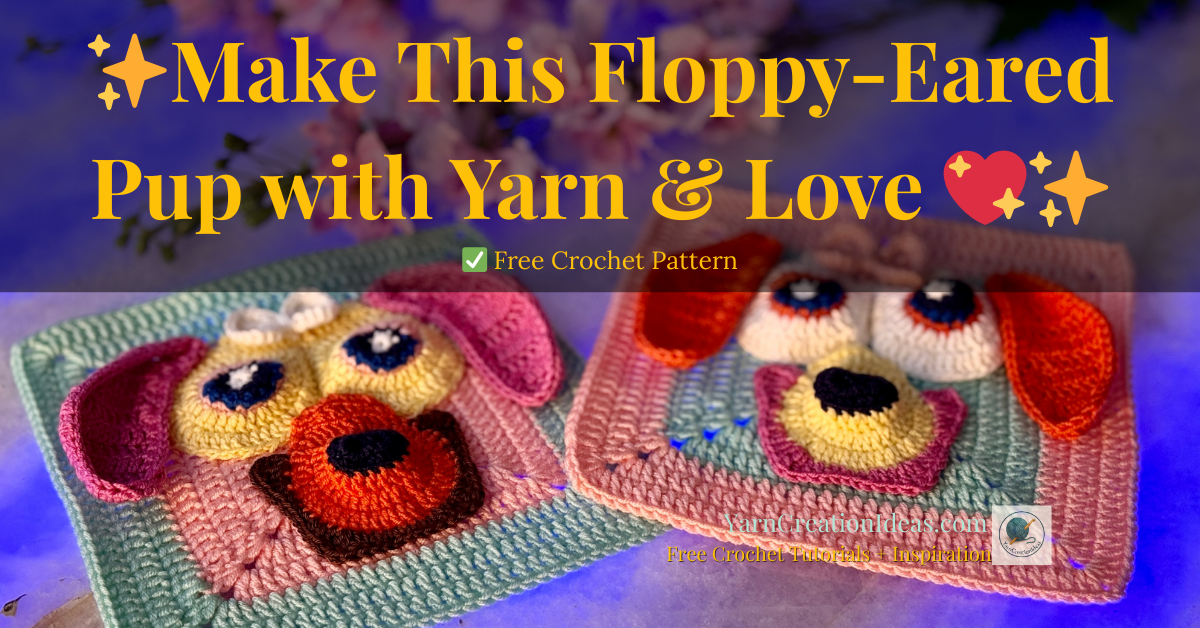
Muzzle & Nose Pattern
Hook: 2.75 mm
Colors: Dark Blue or Black (nose), Bright Orange (muzzle), Brown (lower lip area)
Nose Circles (Dark Blue or Black)
Slip knot, Ch 5, join with a sl st to form the first circle
Ch 5 again, sl st into the first circle
→You now have 2 small connected circles
Ch 1, work 8 SC into the first circle
Then work 8 SC into the second circle
Total: 16 SC
Sl st to close the round
Muzzle Expansion (Bright Orange)
Round 1:
Join yarn in BLO
Work: STACKED SC + 1 DC in same stitch, then 1 DC in next 2 stitches
Then: (2 DC in same stitch, 1 DC in next 2 stitches) × 4
Total: 20 stitches
Round 2:
STACKED SC + 1 DC in same stitch, 1 DC
Then: (2 DC in same stitch, 1 DC) × 9
Total: 30 stitches
Round 3:
STACKED SC + 1 DC in same stitch, 1 DC
Then: (2 DC in same stitch, 1 DC) × 14
Total: 45 stitches
Top Ridge Detail
Turn your work
Sl st across the next 10 stitches
Ch 1, turn
In BLO: 3 SC, 1 HDC, 2 DC, 1 HDC, 3 SC (10 stitches)
In BLO: Sl st, 1 SC, 4 DC, 1 HDC, 1 SC, Sl st (9 stitches)
Lower Muzzle Accent (Brown)
Prep: Mark the center bottom point of your muzzle
Count 17 stitches to the left and 17 to the right — these are your working stitches (34 total)
With brown yarn, make a slip knot
Join at the first marked stitch
Work the following:
STACKED SC, then 2 TR in same stitch
1 DC in next 2 stitches
1 HDC in next 2 stitches
1 SC
1 HDC in next 2 stitches
1 DC in next 2 stitches
3 TR in same stitch
1 DC in next 2 stitches
1 HDC in next 2 stitches
1 SC in the center stitch
1 HDC in next 2 stitches
1 DC in next 2 stitches
3 TR in same stitch
1 DC in next 2 stitches
1 HDC in next 2 stitches
1 SC
1 HDC in next 2 stitches
1 DC in next 2 stitches
3 TR in same stitch
1 DC
Floppy Ears (Make 2)
Hook: 2.75 mm
Yarn: Bright Pink
Technique: Rows (not rounds)
Row-by-Row Instructions
Row 1:
Slip knot, Ch 6
Work 2 DC in the 4th chain from hook, then 1 DC in each of the next 2 chains Turn
Row 2:
STACKED SC, 1 DC in the next 2 stitches, 3 DC in the same stitch Turn
Row 3:
STACKED SC, 2 DC in the same stitch, 1 DC in the next 5 stitches Turn
Row 4:
STACKED SC, 1 DC in the next 6 stitches, 2 DC in the same stitch Turn
Row 5:
STACKED SC + 1 DC in same stitch, 1 DC in the next 8 stitches Turn
Row 6:
STACKED SC, 1 DC in the next 8 stitches Turn
Row 7:
Insert hook in the second stitch from the hook, then:
STACKED SC, 1 DC in the next 7 stitches Turn
Row 8:
STACKED SC, 1 DC in the next 6 stitches Turn
Row 9:
Insert hook in the next stitch from the hook, then:
STACKED SC, 1 DC in the next 5 stitches Turn
Row 10:
STACKED SC, 1 DC in the next 4 stitches Turn
Row 11:
Insert hook in the next stitch from the hook, then:
STACKED SC, 1 DC in the next 3 stitches
Optional Border
To finish off the floppy ear with a nice edge:
Ch 1, then work 2 HDC per row end
Repeat all the way around the ear (4 sides total)
Refer to the video for exact hand placement if needed
🎀 Bow
Hook: 2.75 mm
Yarn: Bright color of your choice (pink, yellow, or anything playful!)
🧵 Pattern Instructions
Start with a Magic Ring (MR)
Ch 6, then work 4 Treble Crochet (TC) into the MR
Ch 5, 1 SC into the MR
Ch 5, 4 TC into the MR again
Ch 5, 1 SC, sl st to close the round
Pull the tail of the MR to tighten and close the bow
✨ Finishing the Bow
Wrap the tail yarn tightly around the center of the bow a few times
Use a tapestry needle to secure the yarn ends neatly
Sew the finished bow to the top of the eyes on your appliqué
🧵 Final Assembly Instructions
Now it’s time to bring your adorable Poppy Dog to life! 🐶💕
Carefully arrange all your finished pieces: eyes, muzzle, ears, and bow, positioning them on top of your granny square base.
Use stitch markers or clips to hold everything in place while you adjust spacing and symmetry.
✂️ Sewing Tips:
Use a tapestry needle and matching yarn for each piece.
Sew through the top stitches only to avoid having visible seams on the back of your granny square.
Secure each element with small, neat stitches, especially around curved pieces like the ears and muzzle.
Gently weave in all tails on the back, and double-check that everything is securely attached.
💡 Pro Tip: Once assembled, lightly steam block the entire square (optional) to help the appliqué lay flat and hold its shape. NOTE: I did not steam block them (I like the 3D look)
🎬 Video Tutorial
Prefer to follow along step-by-step? Watch the full video tutorial below!
In this video, I walk you through each part of the Poppy Dog Appliqué — from the granny square base to the floppy ears and bow. 🐶✨
👉 Grab your yarn, hook, and let’s crochet together!
📢 Pattern Terms of Use & License
✅ You are welcome to sell finished products made from this pattern — handmade with love is always appreciated!
🚫 You may not sell, reproduce, or redistribute the pattern itself in any form, whether digital or printed.
🧶 For kits, workshops, or mass production, please contact me directly to request permission.
📸 If you share your finished Poppy Dog Appliqué, I’d love to see it!
Please credit:
👉 YarnCreationIdeas.com
Tag me on social media so I can cheer you on! 💕
🔗 Want to share this pattern with others?
You’re welcome to share the blog post link directly so others can enjoy the free tutorial too! Please don’t copy and paste the pattern elsewhere.
💬 Comments & Questions
Have a question about the pattern? Need help with a stitch?
I’m here to help!
🧶 Feel free to leave a comment below — I love hearing from you. Whether it’s a question, a finished project you want to show off, or just saying hello, your messages mean a lot! 💕
📸 If you made the Poppy Dog Appliqué, be sure to tag me on social media or share it using the hashtag #YarnCreationIdeas so I can celebrate your creativity!
Let’s stitch and grow together! 🌟
📥 Call to Action | 💖 Keep the Yarn Love Going!
Loved this free pattern? Here’s how you can support and stay inspired:
📌 Pin this post to save it for later and help others discover it too!
🔍 Explore more free patterns on my blog — from cute amigurumi to creative home decor projects.
🎥 Subscribe to my YouTube channel for step-by-step video tutorials and new ideas each week!
💖 Your support helps keep these patterns free and fuels even more crochet fun! Thank you!